The E-commerce page in your Tryon dashboard is where you connect your online store, install the Tryon widget on your site, configure where the try-on button appears, and set how many photos each customer type can generate. This article walks through the four steps in order so you can take a brand-new account to a fully working try-on integration.
The full configuration page looks like this once every step is complete:

Step 1 — Connect your store
The first step links your e-commerce platform to Tryon. Click CONNECT on Step 1 to open the connection form.

You'll be asked for two pieces of information:
- Your e-commerce website URL — the public URL of your store (e.g.
https://yourstore.com). - E-commerce Platform — pick the platform your store runs on. If your platform isn't in the grid, choose JavaScript for a generic integration.
Important
Once you save the configuration, the URL and platform cannot be changed from the dashboard. You'll need to contact technical support at [email protected] to alter it. Double-check both fields before clicking SAVE AND CONTINUE.
Once connected, the Step 1 card shows your connected platform logo, your License Key, the connected store URL, and a CHANGE CONNECTED STORE button:
The License Key displayed here is what you'll paste into the platform-specific module (PrestaShop module, Shopify app, etc.) so it can authenticate requests to Tryon.
Platform-specific guides
The exact installation steps depend on which platform you chose. Pick your platform below for the detailed walkthrough:
| Platform | Guide |
|---|---|
| PrestaShop | Read the guide |
| Shopify | Read the guide |
| WooCommerce | Read the guide |
| Magento | Read the guide |
| BigCommerce | Read the guide |
| Nuvemshop | Read the guide |
| JavaScript (custom integration) | Read the guide |
Step 2 — Integration instructions
Once your store is connected, Step 2 unlocks. The card title becomes Integration instructions for {your platform} and a SEE INSTRUCTIONS button appears. Clicking it opens a panel with the exact steps for your platform.
For PrestaShop, the panel looks like this:

The panel typically contains:
- A download link for the official platform module/plugin (when applicable).
- The installation steps inside your platform's admin (e.g. PrestaShop's back office).
- A button snippet for custom placements — use it when you want a Try On button somewhere the module doesn't automatically inject one.
Your License Key is shown on Step 1 (one block above) — copy it from there when the platform module asks for it.
Free installation
Don't want to install the integration yourself? Contact [email protected] and the Neuralyn team will install it for you for free.
Step 3 — Configure store buttons
Step 3 controls where and how the Try On button appears on your storefront. Click CONFIGURE to open the configuration page.
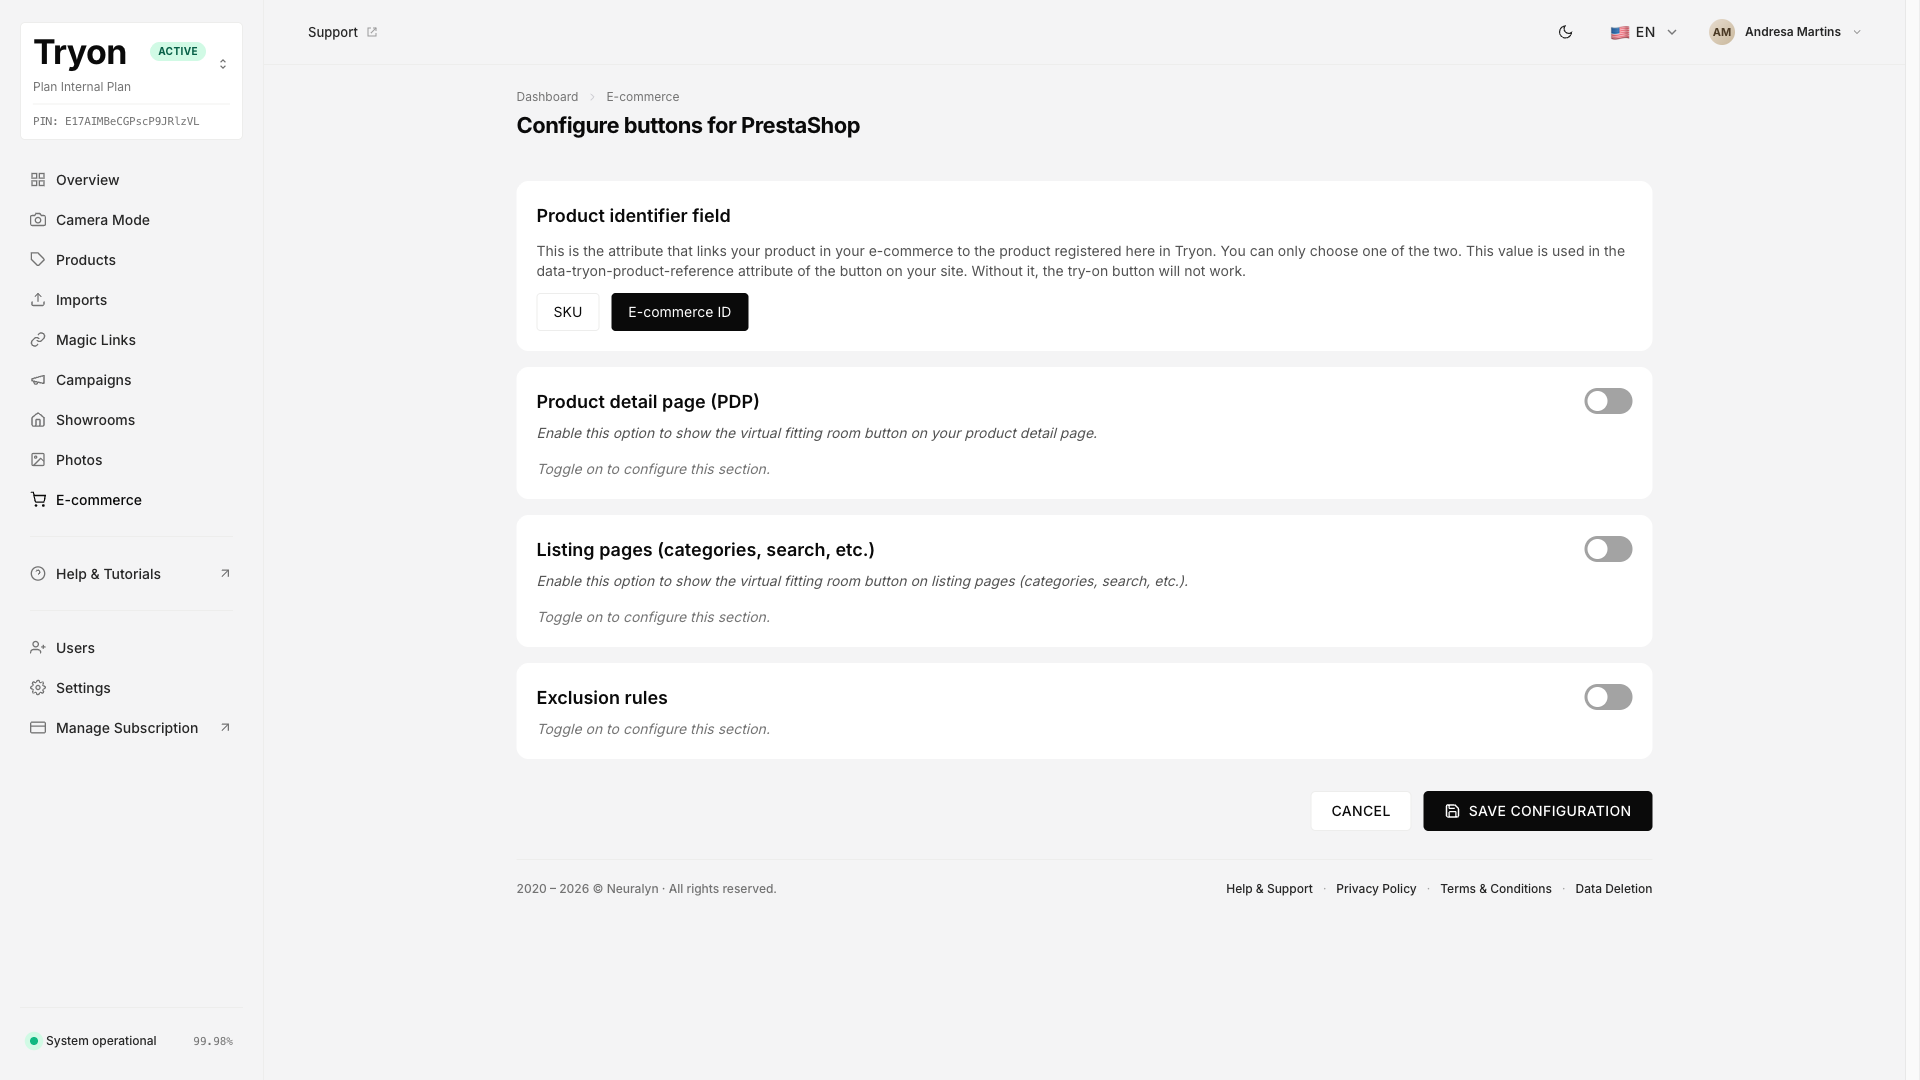
The page is split into four blocks, briefly described below.
Product identifier field
This is the attribute used to match products in your store to products registered in Tryon. Pick one of:
- SKU — uses the product SKU as the reference.
- E-commerce ID — uses the platform's internal product ID.
The chosen value is placed in the data-tryon-product-reference attribute of every Try On button. Without it, the button cannot identify which product to try on.
Product detail page (PDP)
Enable this toggle to show the Try On button on individual product pages. When you turn it on, sub-options appear: button style (predefined / custom), model and colors, button positioning, tooltip, and the injection method (automatic / custom / manual).
Listing pages (categories, search, etc.)
Enable this toggle to show the Try On button on listing pages — category pages, search results, and similar. The configuration options mirror the PDP section: pick a button style, model, colors, positioning, tooltip and injection method.
Exclusion rules
Use this section to add URL patterns where the Try On button should never appear, regardless of whether the page would otherwise be considered a PDP or a listing. Useful for landing pages, blog posts, or pages where a try-on doesn't make sense.
When you click SAVE CONFIGURATION with at least one section enabled, Step 3 is marked as Configured and Step 4 unlocks.
Detailed guides for button customization
Each customization area has a dedicated guide:
| Topic | Guide |
|---|---|
| How to configure your Tryon button colors | Read the guide |
| How to configure your Tryon button text | Read the guide |
| How to configure your Tryon button position | Read the guide |
Step 4 — Photo limits
Step 4 controls how many Tryon photos each customer type can generate, and whether the same product can be regenerated. It only unlocks once Step 3 is saved.

The page exposes four controls:
- Limit Period — currently fixed to Monthly. Each customer's counter resets on the same renewal date as your store-wide Image Credits.
- Allow regeneration — when on, customers can generate a new image for a product they have already tried on before (consuming one extra Image Credit). When off, repeated try-ons return the cached image and consume no credit.
- Registered Customers — toggle on/off, and set a per-customer monthly photo limit or pick Unlimited.
- Guest Customers — toggle on/off, and set a shared photo limit across all anonymous visitors (or pick Unlimited). Be careful with this one — viral Magic Links can burn through the quota quickly.
Full Photo limits guide
For the full reference of how Photo Limits work, including the error codes the widget returns when a generation is blocked, see How photo limits and regeneration work on Tryon.
Need help?
If you get stuck on any of the four steps, contact [email protected]. The Neuralyn team can install the integration for you for free and walk you through the button and photo-limit configuration.