The Imports feature lets you add dozens or hundreds of garments to Tryon at once by pointing to your existing Google Shopping feed — no manual uploads required. This article walks you through every step, from pasting the feed URL to starting the final import.
Before you start
Feed requirements
Your feed must be a Google Shopping XML file (RSS 2.0 with the g: namespace). Each item needs the following fields:
| Field | Required? | Notes |
|---|---|---|
g:id | Required | Unique product identifier — used as SKU. |
title | Required | Product name. |
description | Required | Product description. |
link | Required | Product page URL. |
g:image_link | Required | Main product image URL. |
g:additional_image_link | Optional | Extra images. |
g:availability | Optional | Set to in stock for in-stock filtering to work. |
application/xml, text/xml, application/rss+xml. You can have up to 5 active draft imports at the same time.
Step-by-step walkthrough
1 Open the Imports page and click Import feed
In the left sidebar, click Imports. The page lists all your previous and ongoing imports. Click the Import feed button in the top-right corner to start a new one.
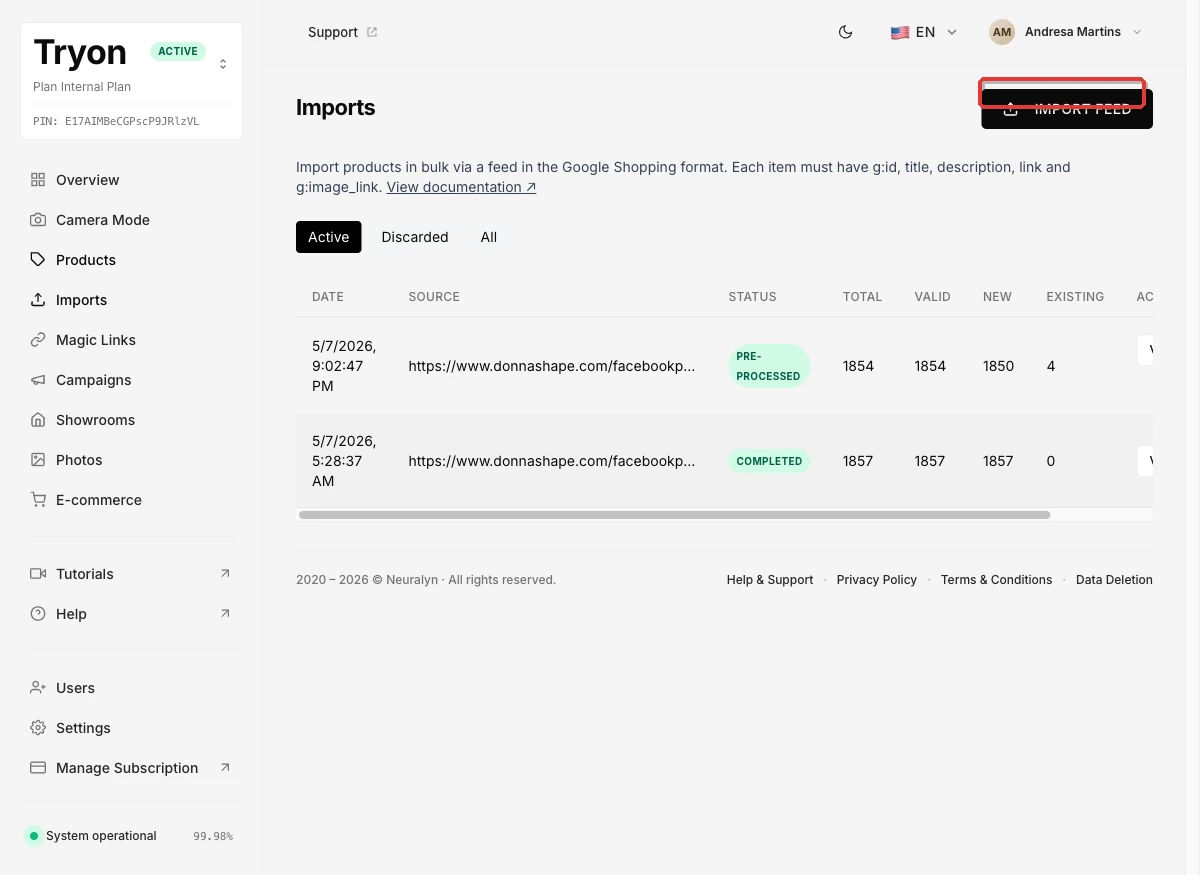
The Imports list. The red box marks the Import feed button.
2 Provide your feed — URL or file upload
There are two ways to supply your feed. Choose the tab that fits your situation:
URL tab (most common) — paste the public address of your feed file. The platform downloads and parses it automatically.
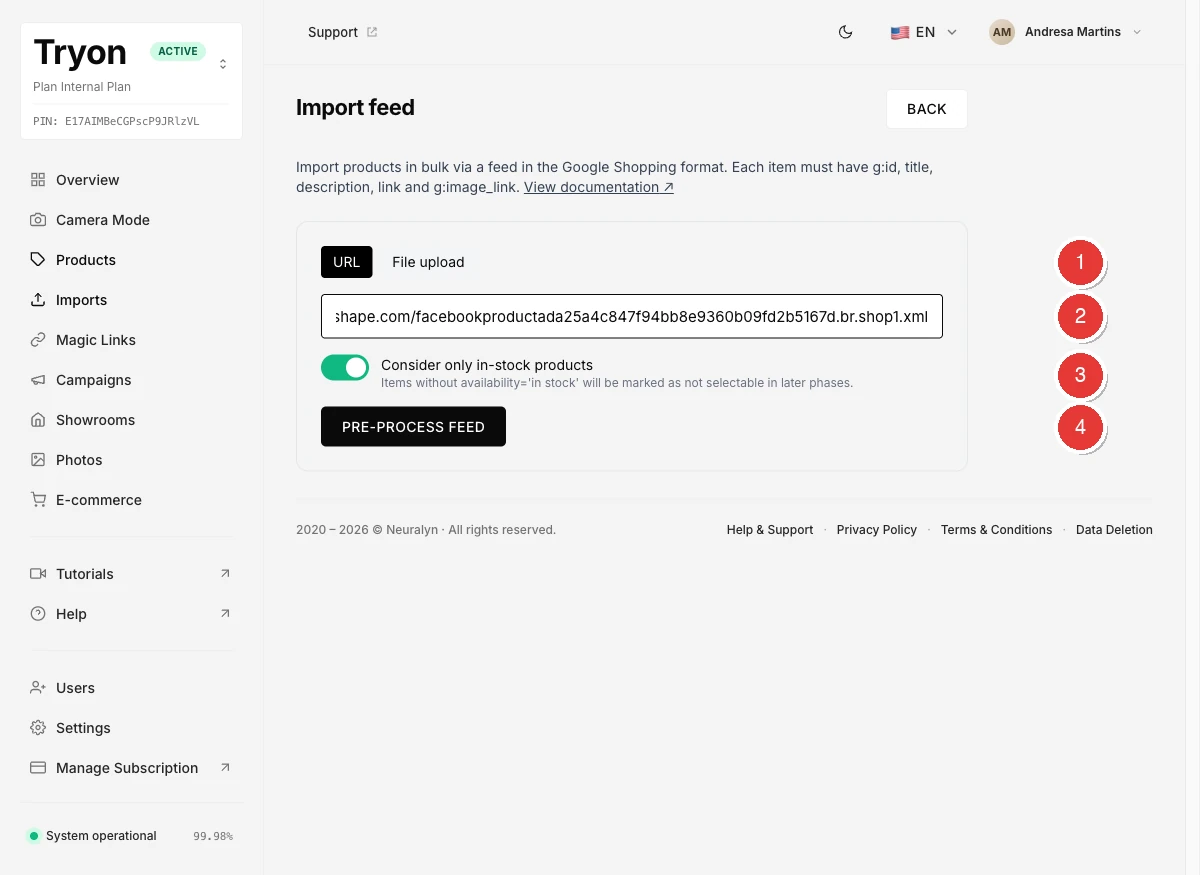
1 URL tab 2 Feed URL field 3 Consider only in-stock products toggle 4 Pre-process feed button
Before clicking Pre-process feed, decide whether to enable the in-stock filter (marker 3):
- Consider only in-stock products — ON: Items whose
g:availabilityis notin stockwill be excluded from selection in later steps. Useful if you only want to import what is currently available. - Consider only in-stock products — OFF: All items in the feed are eligible, regardless of availability.
File upload tab — if your feed is not publicly accessible, switch to the File upload tab and choose an XML file from your computer (up to 25 MB).
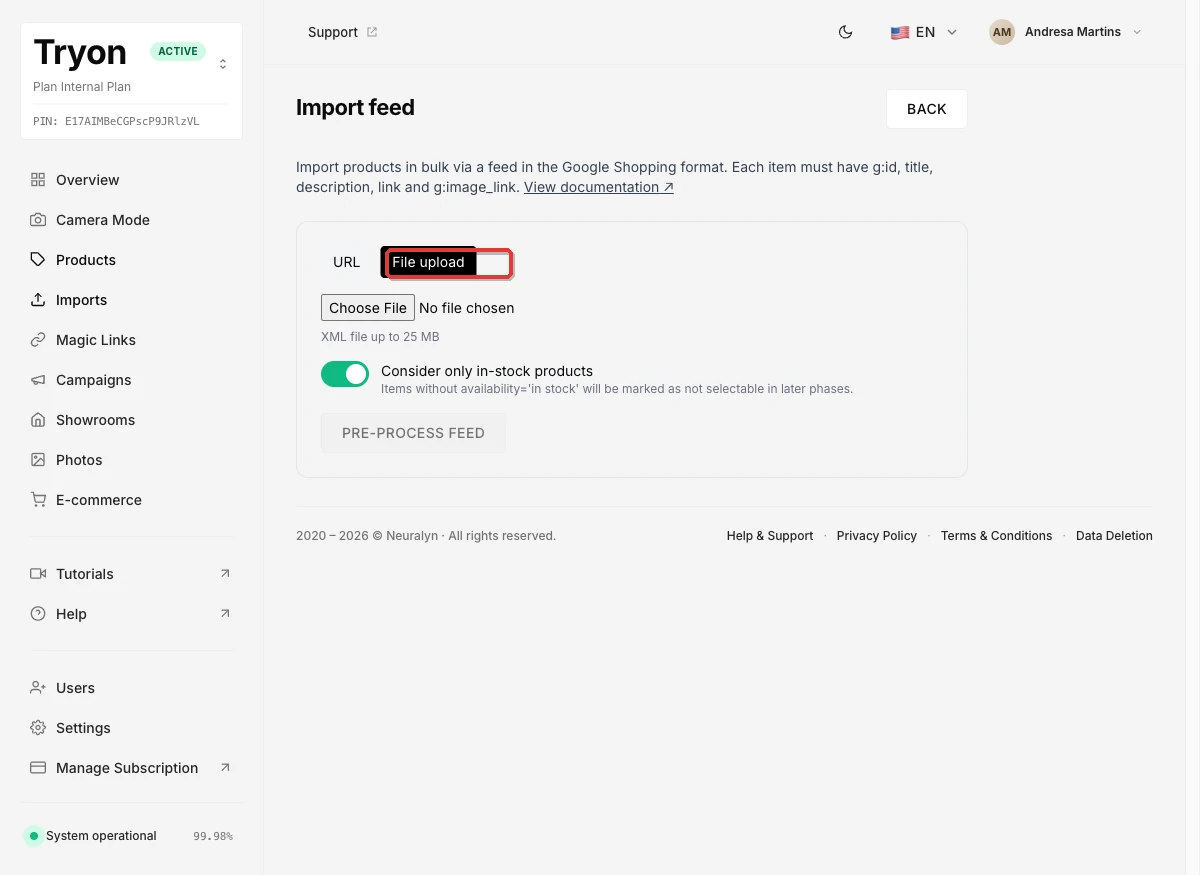
The File upload tab. Click Choose File to pick an XML file. The in-stock toggle works the same way as on the URL tab.
3 Review the pre-processing summary
After clicking Pre-process feed, Tryon downloads and parses your feed. This usually takes a few seconds. When it finishes, you see a summary with the following counters:
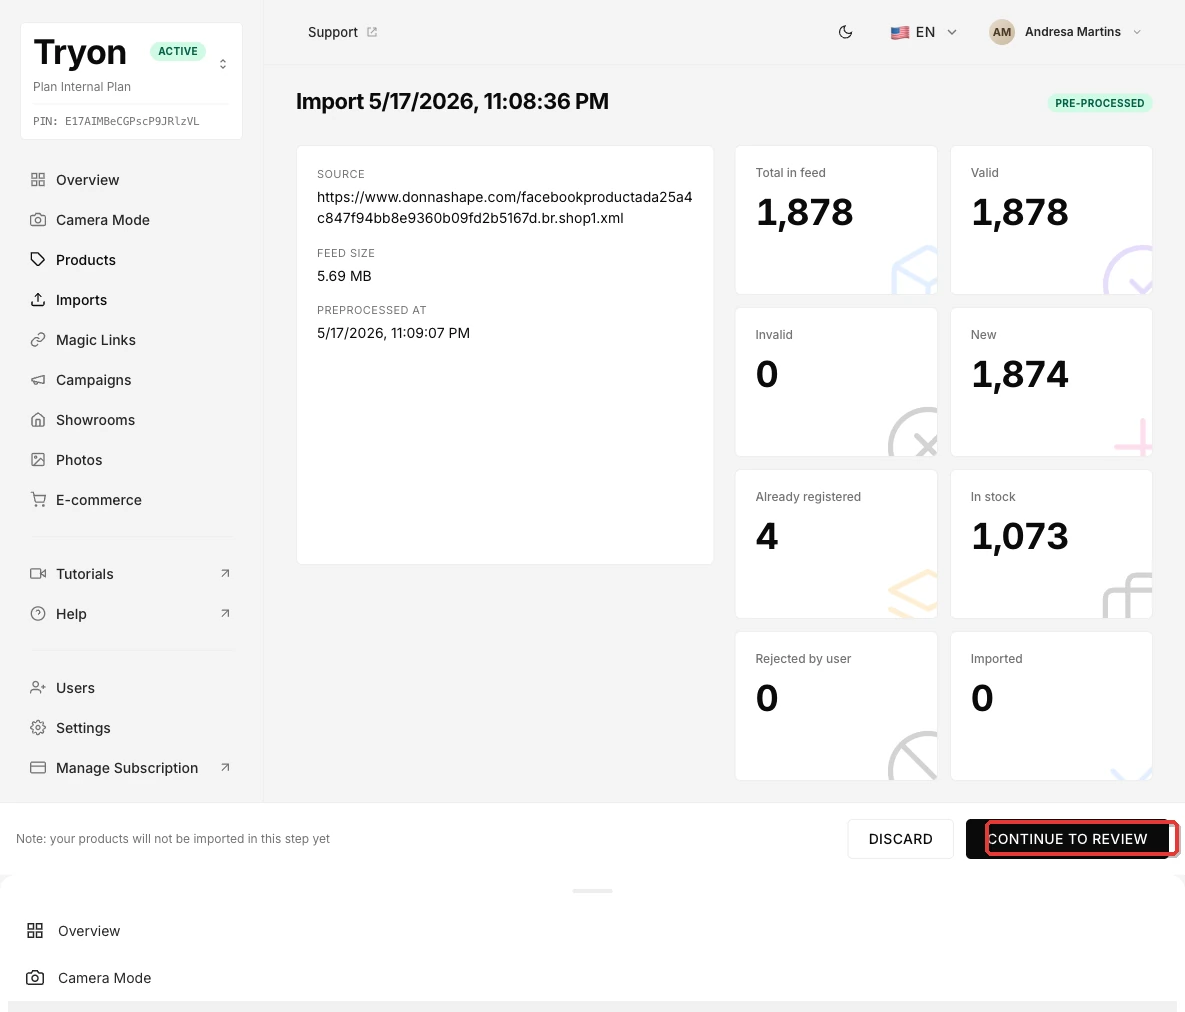
Pre-processing summary. The Continue to review button (highlighted) appears once processing is complete.
| Counter | What it means |
|---|---|
| Total in feed | All items found in the feed file. |
| Valid | Items that have all required fields and a reachable image URL. |
| Invalid | Items that are missing required fields or have errors. |
| New | Items whose SKU does not yet exist in your Tryon catalog. |
| Already registered | Items whose SKU already exists in Tryon. |
| In stock | Items marked as in stock in the feed (only relevant when the in-stock filter is on). |
If the numbers look correct, click Continue to review to open the configuration wizard.
4 Wizard step 1 of 4 — Select categories
The wizard groups your feed items by product category. Each row shows the category name, the number of items, and whether it is supported by Tryon's AI.
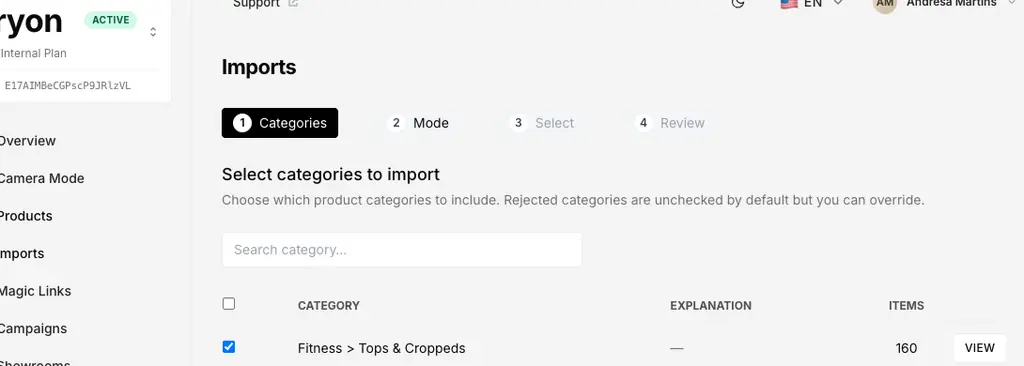
Step 1 — Categories. Supported categories are pre-checked. Unsupported ones show an explanation and cannot be selected.
- Checked (blue): category is supported and will be included by default. Uncheck any category you do not want to import.
- Unchecked with explanation: category is not supported by Tryon (e.g. "Accessories are not supported."). These items will be skipped.
- VIEW: click to preview the individual items in that category before deciding.
Once you have selected the categories you want, click Next.
5 Wizard step 2 of 4 — Choose import mode and options
This step controls how the import interacts with your existing catalog. First, pick a mode:
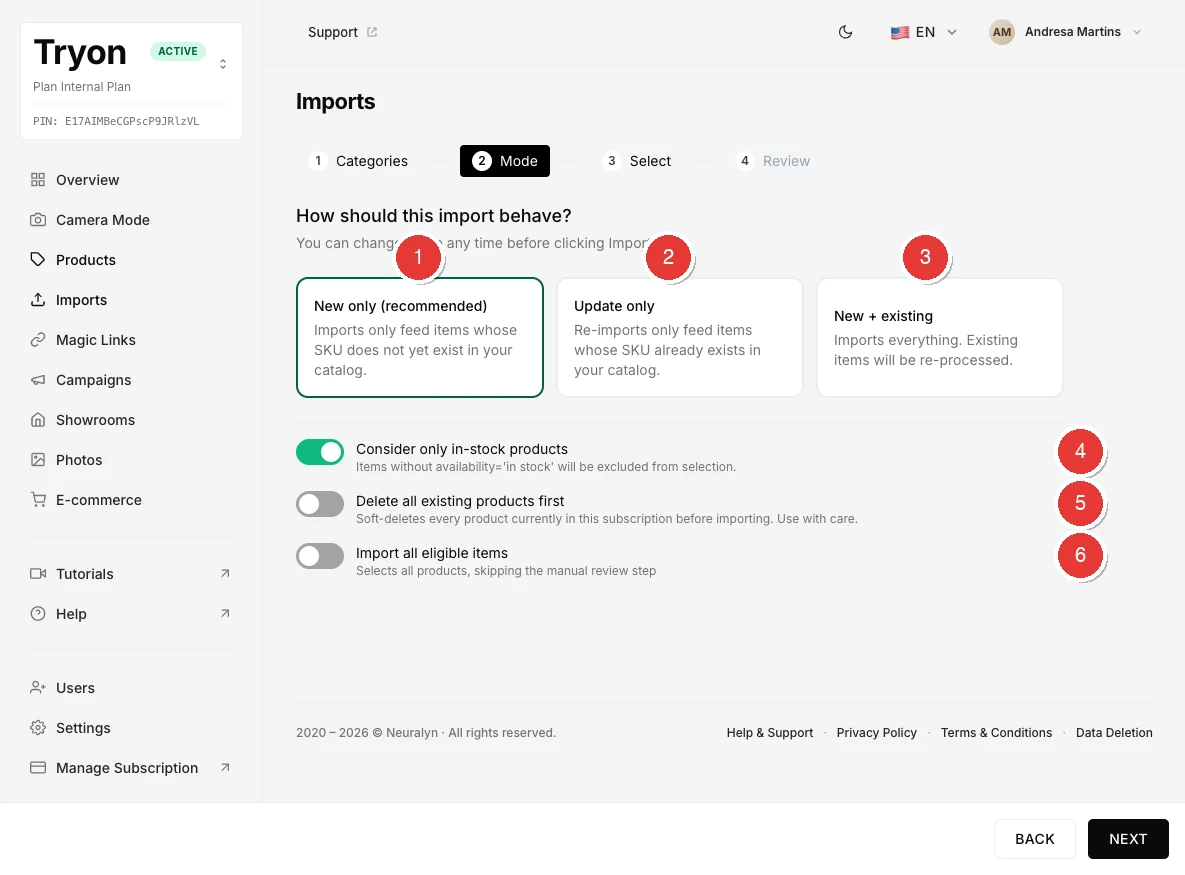
1 New only (recommended) 2 Update only 3 New + existing | 4 Consider only in-stock products 5 Delete all existing products first 6 Import all eligible items
| Mode | What gets imported |
|---|---|
| New only Recommended | Only feed items whose SKU does not yet exist in your catalog. Already-registered products are skipped. |
| Update only | Only feed items whose SKU already exists in Tryon. Their images are re-processed. |
| New + existing | All eligible items. New ones are created; existing ones are re-processed. |
Then configure the three additional options:
- Consider only in-stock products — when on, items without
g:availability = in stockare excluded from selection. Inherits the value you set in step 2, but you can change it here. - Delete all existing products first — soft-deletes every product currently in your subscription before the import runs. Use with care: this cannot be undone.
- Import all eligible items — skips the manual item-selection step (step 3 of the wizard) and imports everything that passes the category and in-stock filters automatically.
When you are happy with the settings, click Next.
6 Wizard step 3 of 4 — Select items
This step lets you hand-pick exactly which items to import. The list shows each item's SKU, title, thumbnail, stock status, and whether it is new or already registered.
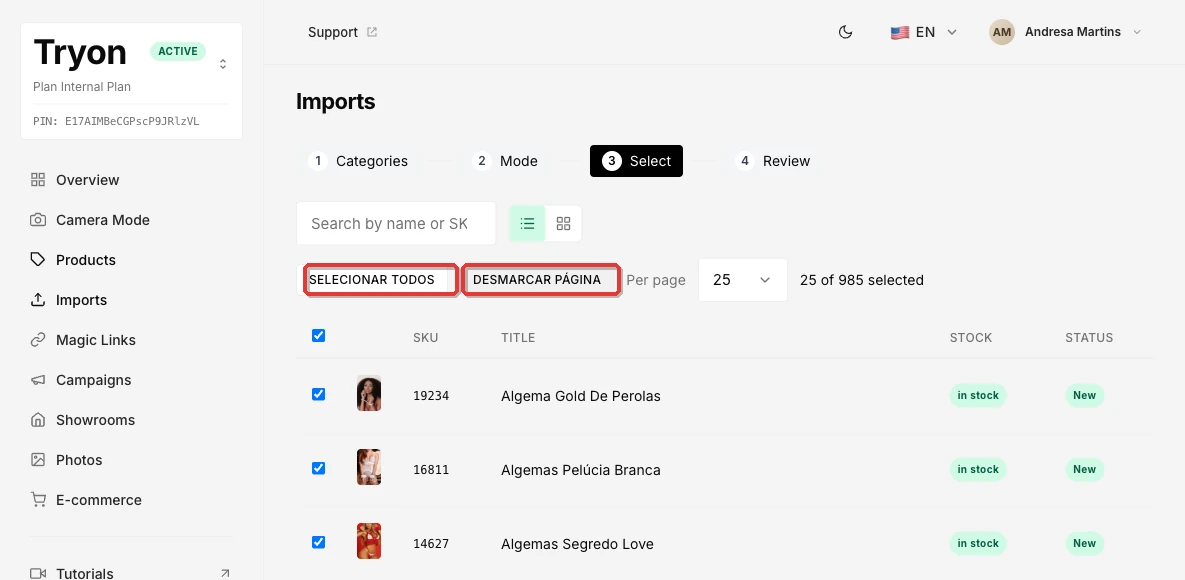
Step 3 — Select. Use the selection buttons and search box to choose which items to import.
- Select all: selects every item across all pages.
- Select page / Deselect page: toggles the current page only.
- Search box: filter by product name or SKU.
- Per-page dropdown: change how many items appear per page (up to 25).
- Individual checkboxes let you include or exclude specific items.
Once you have made your selection, click Next.
7 Wizard step 4 of 4 — Review and validate
The final wizard step shows a summary of everything you have configured and the credit cost of the import.
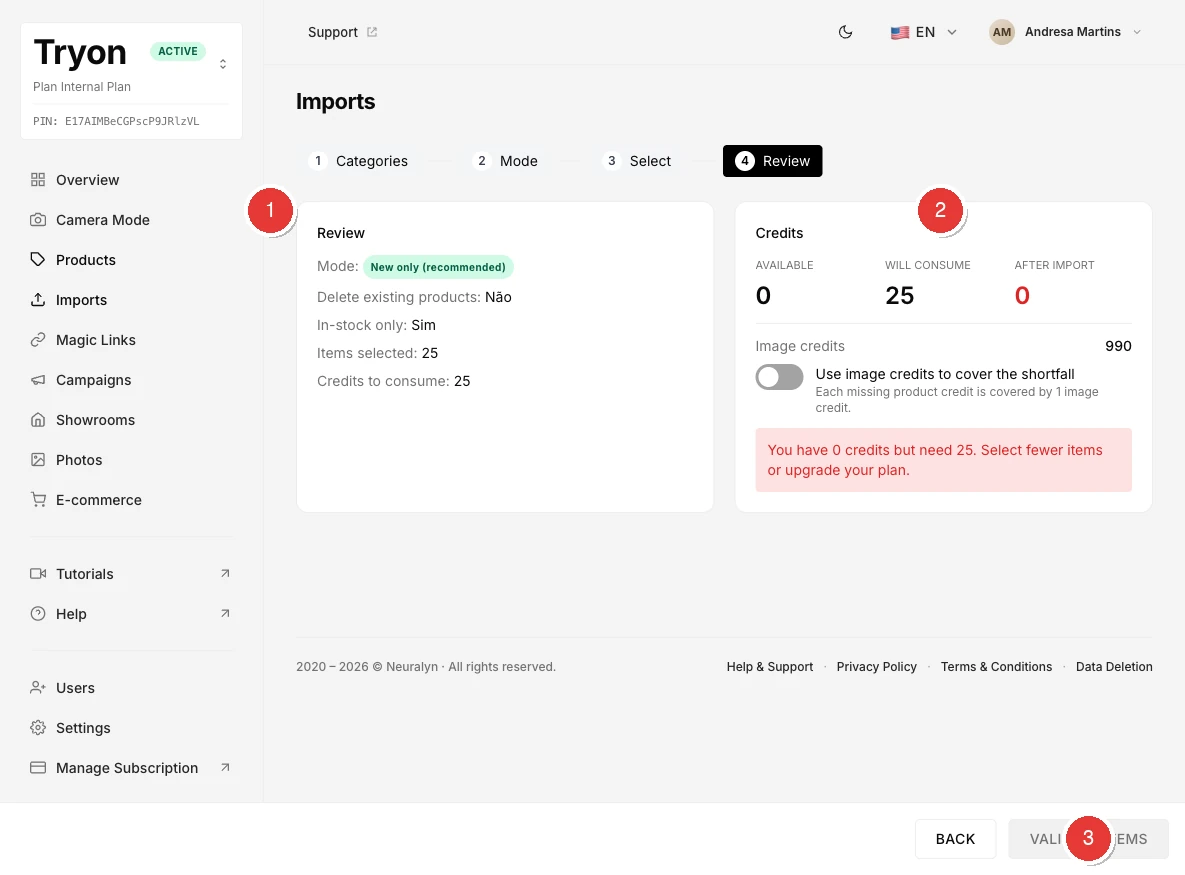
1 Import settings summary 2 Credits panel 3 Validate items button
The Credits panel on the right shows:
- Available: product credits remaining in your plan.
- Will consume: 1 product credit per item selected.
- After import: credits remaining after the import completes.
If you do not have enough product credits, you can enable Use image credits to cover the shortfall. Each missing product credit is replaced by 1 image credit. If neither credit type covers the cost, you will see an error and the Validate items button stays disabled.
When credits are sufficient, click Validate items to start the import.
8 Wait for processing and check the result
After validation, Tryon runs the import in the background through two phases:
- Vision analysis — each item's image is analysed by AI to detect garments, check poses, and build the virtual try-on template. Status shows VISION PROCESSING.
- Importing — approved items are created as products in your catalog. Status shows IMPORTING.
When everything finishes, the import status changes to COMPLETED. You can click View report to see a breakdown of how many items were imported, rejected, or skipped.
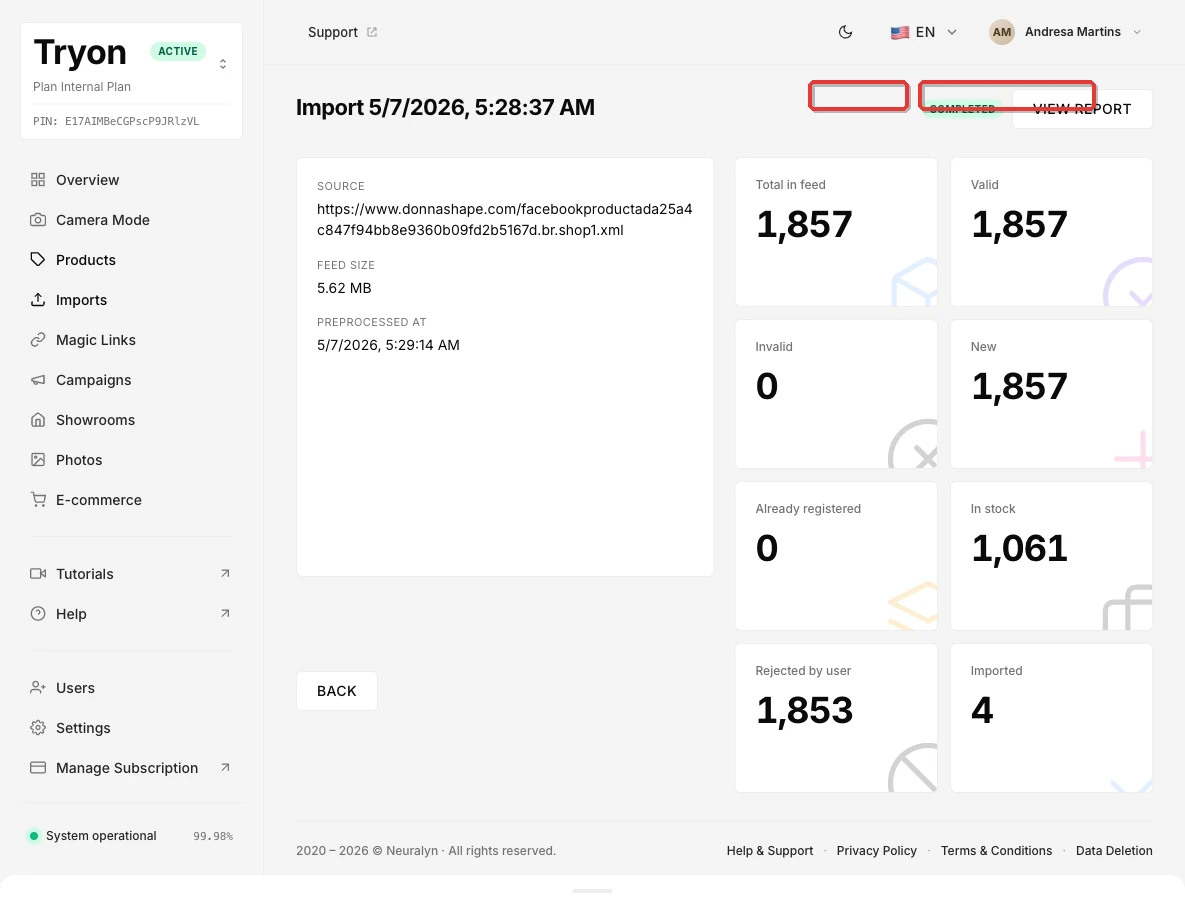
A completed import. The status badge and View report button are highlighted.
Common errors and how to fix them
| Error / situation | What happened | What to do |
|---|---|---|
| Feed file too large | The feed exceeds the 25 MB limit. | Split the feed into smaller files and import in batches. |
| Invalid file type | The feed is not a valid XML file. | Make sure the file uses application/xml, text/xml, or application/rss+xml format. |
| Too many active imports | You already have 5 draft imports in progress. | Discard or complete existing imports before starting a new one. |
| Validate items button disabled | Not enough credits to cover the selected items. | Enable the image credits fallback, select fewer items, or contact support. |
| Item rejected — pose error (back) | The product photo shows the model from the back; the AI cannot process that pose. | Use a front- or side-facing photo for that product. |
| Item rejected — too many people | More than one person appears in the product photo. | Use a photo with a single model. |
| Item rejected — no garments detected | The AI did not find a garment in the image. | Use a clearer photo that prominently shows the clothing item. |
| Item rejected — garment not allowed | The detected garment type is not supported by Tryon. | Check which categories are supported and exclude unsupported ones in step 1. |
| Image fetch failed | Tryon could not download the image from the URL in the feed. | Make sure the image URL is publicly accessible and the server allows external requests. |
Questions?
If you run into anything not covered here, contact our support team and we will be happy to help.